
Action camera white balance issues underwater are one of the most common frustrations when filming dives. One clip may look clean and colourful at 8 metres, while the next turns blue, green, or flat at 22 metres. On a liveaboard itinerary, these colour changes become even more obvious as you move between bright reef tops, shaded walls, manta sites, macro dives, and night dives.
Underwater white balance problems are rarely caused by one setting alone. They usually come from a mix of depth, water colour, ambient light, shooting distance, filter choice, and whether you are filming a wide reef scene or a close subject.
This guide helps you make better decisions before and during your dives, so your footage from Raja Ampat, Komodo, or any multi day dive trip looks more consistent.
If your footage shifts colour between depths, sites, or lighting conditions, the issue is usually not one setting. It is how your camera reacts to depth, water colour, available light, and subject distance. Underwater colour problems are mostly caused by how water absorbs light. Your action camera is trying to interpret a scene where the normal colour spectrum has already changed before the light reaches the lens.
This guide helps you decide when to rely on auto white balance, when to lock your settings, when to use a red or magenta filter, and when video lights are the better solution. If you already dive with an action camera and want more consistent footage across different depths, lighting conditions, and liveaboard dive sites, this is for you.
What Is White Balance?
White balance is your camera’s attempt to define neutral colour in a scene. On land, this is usually straightforward because the camera receives a fuller colour spectrum. Underwater, the light reaching your lens has already changed. Red and orange wavelengths are reduced quickly with depth, while blue and green tones remain more dominant.
This is why the reef may look colourful to your eyes, but your action camera records the scene as cooler, flatter, or much bluer than you remember.
Underwater, the camera has a harder job. Water filters out colours unevenly, and the deeper you go, the more your camera loses warm tones like red and orange. DAN’s Alert Diver notes that red is the first visible colour to disappear underwater, even close to the surface.
This is why your dive video may look cooler and bluer than the reef actually felt in person.
Why Action Camera White Balance Issues Underwater Happen
Action cameras are built to process scenes quickly, but underwater scenes change faster than most auto systems can handle. During one dive, you may move from a sunlit reef top to a shaded wall, then into deeper water with less red light. If your camera keeps recalculating white balance during the same clip, the colour can shift suddenly and make the footage difficult to match in editing.
Underwater, your action camera is trying to balance several variables at once:
· colour loss as you descend
· blue or green water casts
· lower contrast caused by distance and suspended particles
· shifting sunlight direction
· shadows from walls, bommies, or overhangs
· mixed light from ambient light, torches, and video lights
· movement between wide angle scenes and close focus subjects
The deeper you go, the less natural colour your camera receives. A white balance setting can adjust colour temperature, but it cannot fully recover colours that are no longer present in the light reaching the camera. This is also why professional underwater photographers often use lights, strobes, or filters rather than relying on white balance alone.
Why White Balance Matters More on a Liveaboard Trip
On a liveaboard, you are not filming one simple dive profile. You may shoot several dives a day across different depths, light angles, reef structures, and water conditions. That means your camera settings need to work across real dive variety, not just one easy shallow reef.
This is especially true in Raja Ampat and Komodo. One dive may give you bright coral gardens and strong ambient light. The next may take you to a shaded wall, a manta cleaning station, a current swept pinnacle, or a night dive where your video lights become more important than any white balance setting.
On a La Galigo liveaboard, you also have time between dives to review your footage, check whether your clips are too blue, green, dark, or inconsistent, and adjust your setup before the next site. That is one of the biggest advantages of filming from a liveaboard, you can learn and improve throughout the trip instead of waiting until you get home.
These changing conditions are one reason action camera white balance issues underwater become especially noticeable during a multi-day liveaboard trip.
Why Your Underwater Footage Looks Blue or Green
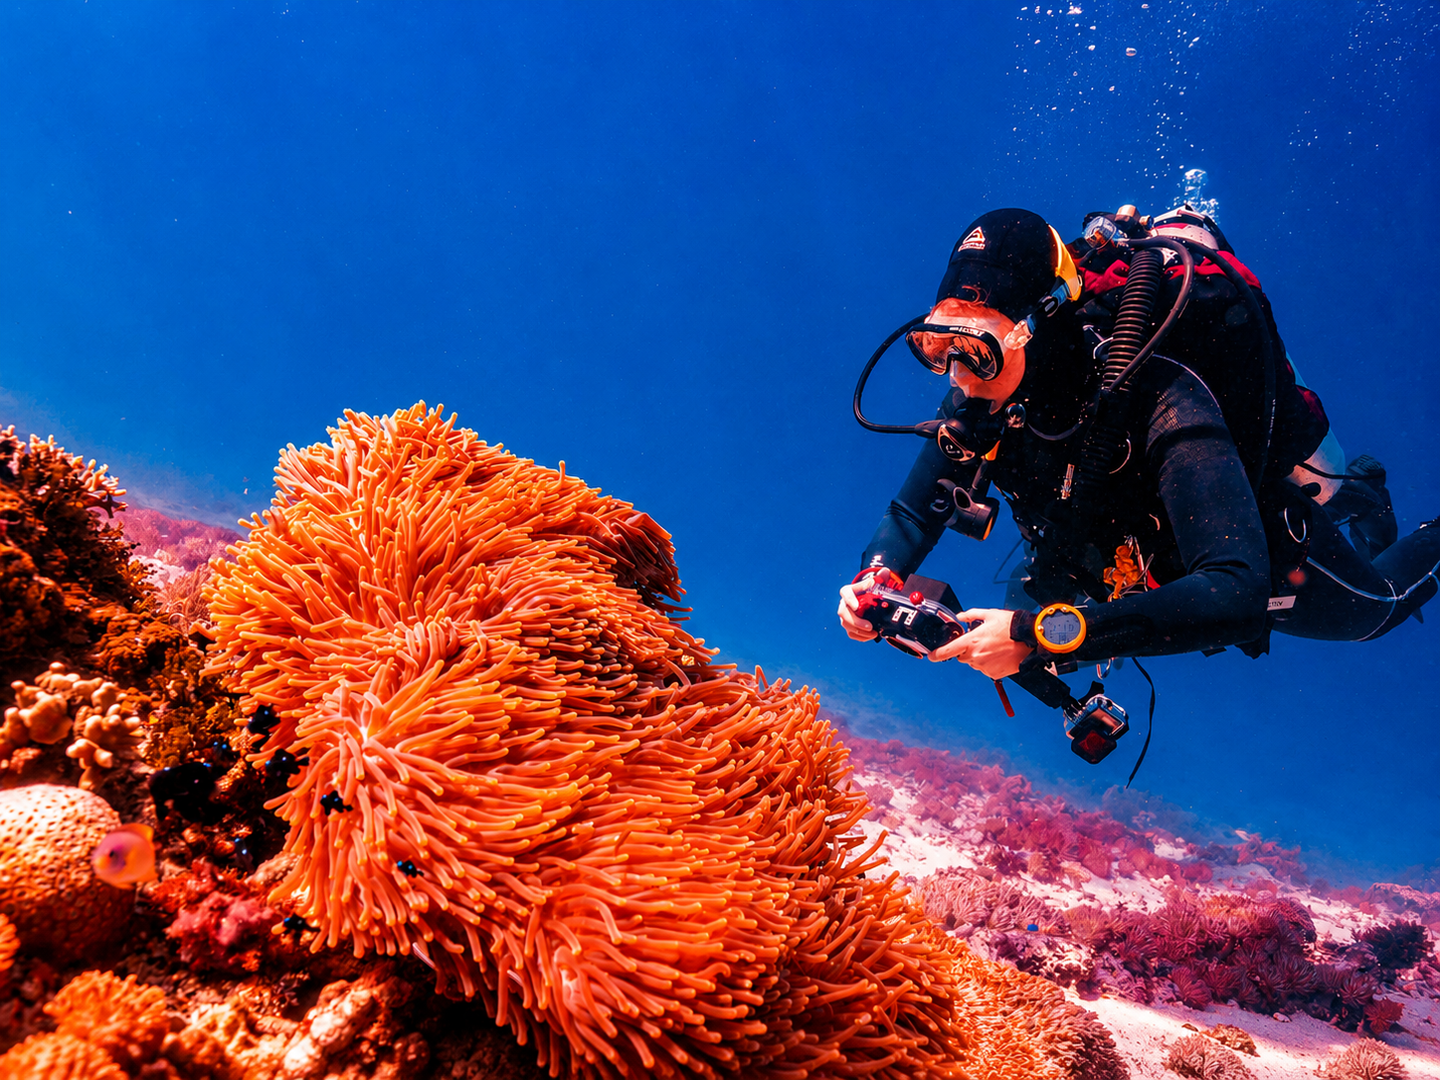
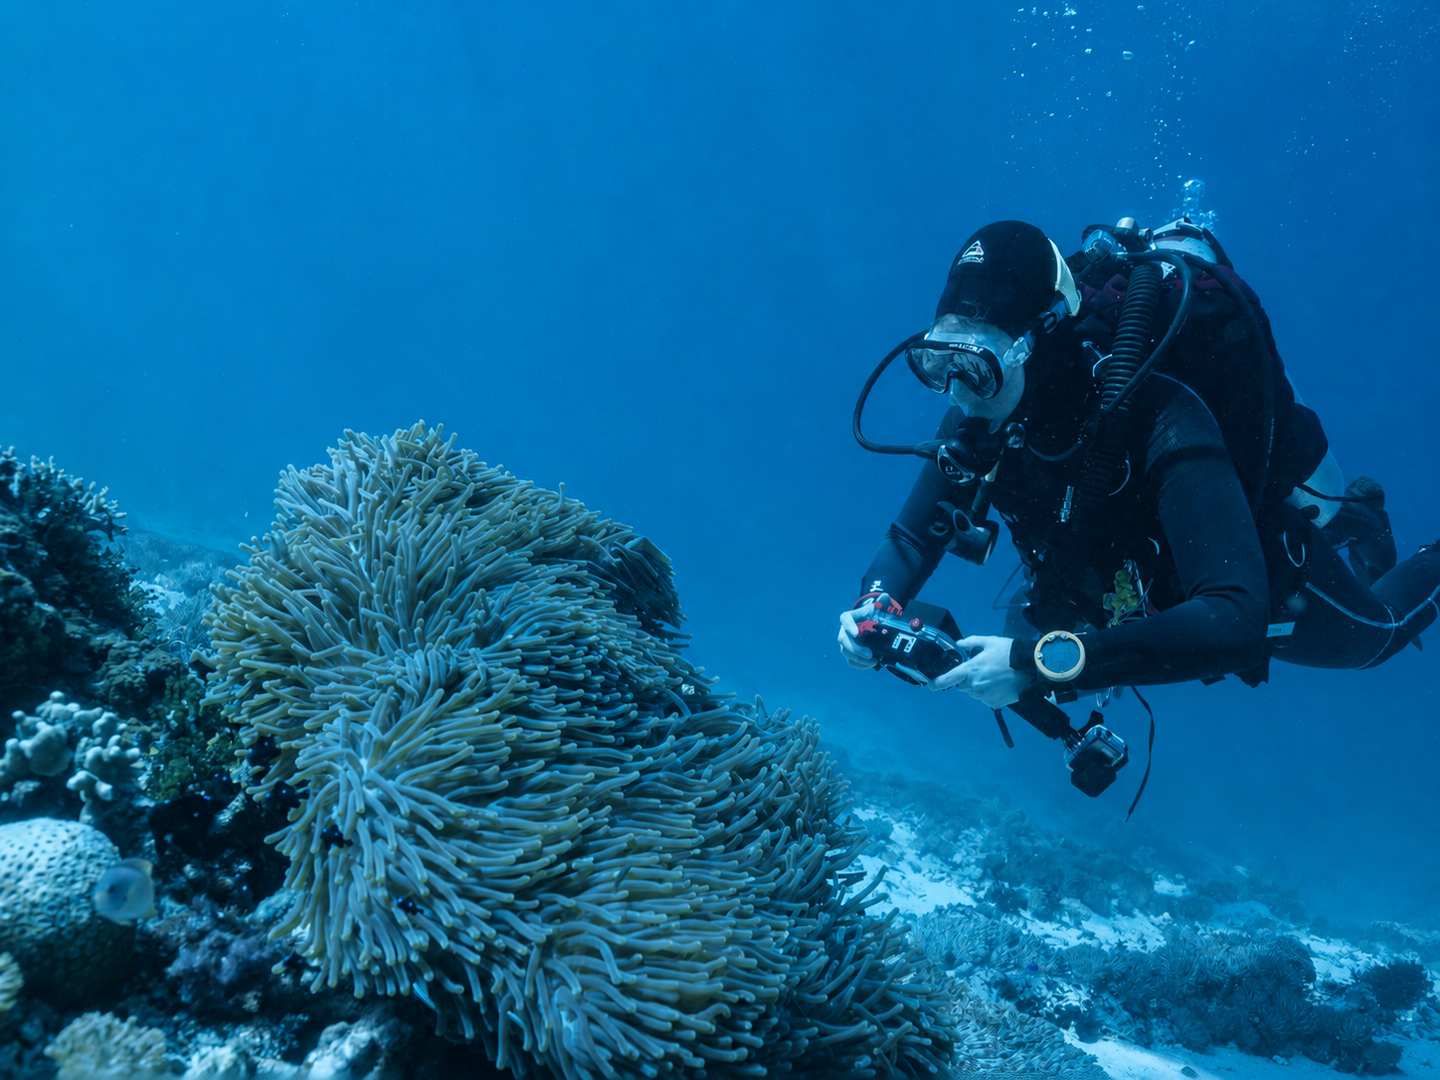
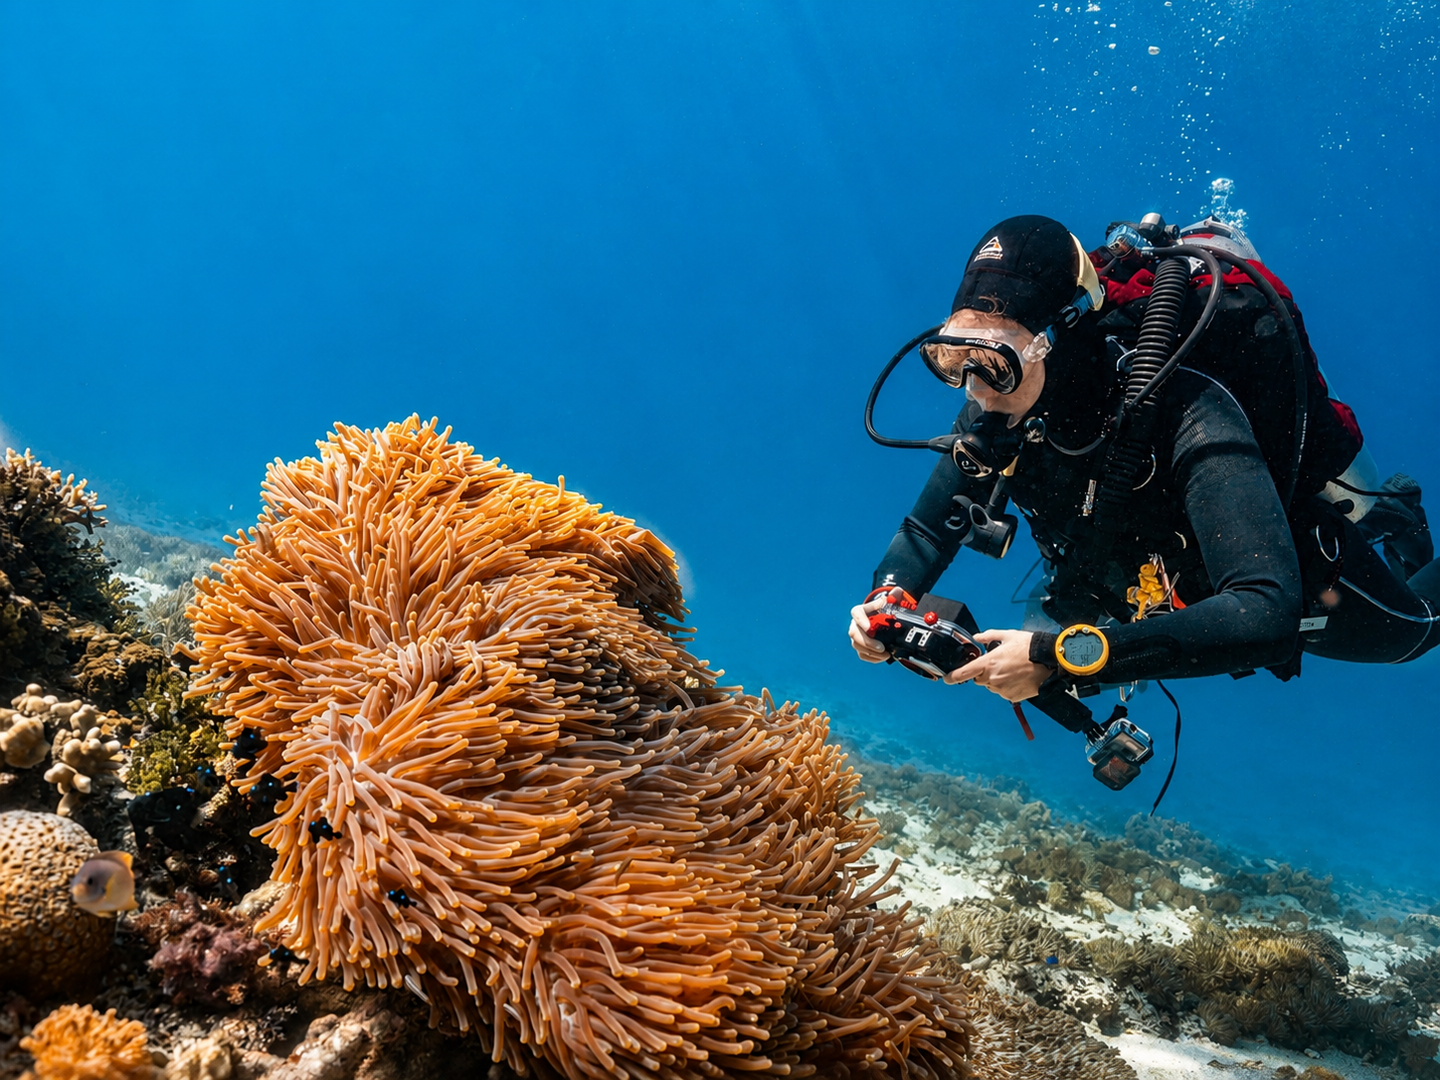
Blue footage is common in tropical water because blue wavelengths travel farther through water than warmer colours. Green footage often happens in plankton rich water, coastal areas, or conditions with more particles in the water column.
This does not mean the site lacks colour or visibility. It means your camera is recording the available light more literally than your eyes and brain do underwater. Your eyes adapt quickly, but your action camera still needs enough usable colour information, stable exposure, and the right correction tool for the scene.
In Indonesia, you may deal with both blue and green colour casts depending on the destination, season, dive site, and current. In Raja Ampat, you may film bright coral gardens, shaded walls, and fish filled reefs with strong ambient light. In Komodo, you may move between current swept pinnacles, manta sites, macro areas, and nutrient rich water where light and colour can shift between dives.
These changing conditions are not a problem when you prepare for them. They are exactly why Raja Ampat and Komodo are so rewarding for divers who understand how to adjust filters, lights, distance, and exposure underwater.
Both destinations can produce incredible footage, but they also reward divers who understand basic underwater colour control.
Auto White Balance vs Manual White Balance Underwater
Auto white balance can work in shallow, bright conditions, but action camera white balance issues underwater often become more obvious as depth, shade, and water colour change. The problem starts when you descend, turn toward open blue water, pass a shaded wall, or combine ambient light with video lights. In those situations, auto white balance may keep changing mid clip.
The common problems with auto white balance underwater are:
- colours shift during the same clip
- blue scenes suddenly become purple or grey
- coral colours look dull
- skin tones look unnatural
- footage from different dives is hard to match in editing
Manual white balance or Kelvin control can give you more consistency, but it is not a complete fix. Even when your camera allows manual control, it cannot restore colours that are no longer present in the available light. At depth, you still need to think about your filter choice, video lights, shooting distance, exposure, and post production workflow. Some models let you choose a Kelvin temperature or a “native”/flat colour profile. Others rely heavily on automatic processing. Backscatter’s GoPro underwater settings guide notes that some GoPro models cannot manually white balance in a way that restores lost red, orange, and yellow tones at depth, so filters become important for restoring warmer colour in ambient light shooting.
A better approach is to think of white balance as one part of the solution, not the whole solution.
How Depth Affects Action Camera White Balance
Depth is one of the biggest causes of action camera white balance issues underwater, because the available colour spectrum changes as you descend.
In very shallow water, your action camera still has access to enough warm colour for decent results. As you descend, the camera receives less red and orange light. By the time you are filming deeper reef scenes, the camera may only have limited colour information to work with.
There is no single white balance setting that works for every part of a dive. A setting that looks clean at 5–8 metres can fall apart at 20–25 metres, especially if you move from a sunlit reef top into a shaded wall or overhang.
Your practical rule is simple: the deeper you go, the more deliberate your setup needs to be. Do not spend the whole dive chasing perfect colour on the screen. Choose your setup before the dive, make small adjustments only when it is safe, and keep your buoyancy, trim, buddy awareness, and reef distance as the priority.
The deeper you go, the less you should expect white balance alone to fix the image.
Your practical rule is simple: the deeper you go, the more deliberate your setup needs to be. For wide ambient light scenes, think about filters. For close subjects, use video lights. For inconsistent clips, plan for post production before you start filming.
Should You Use a Red Filter?
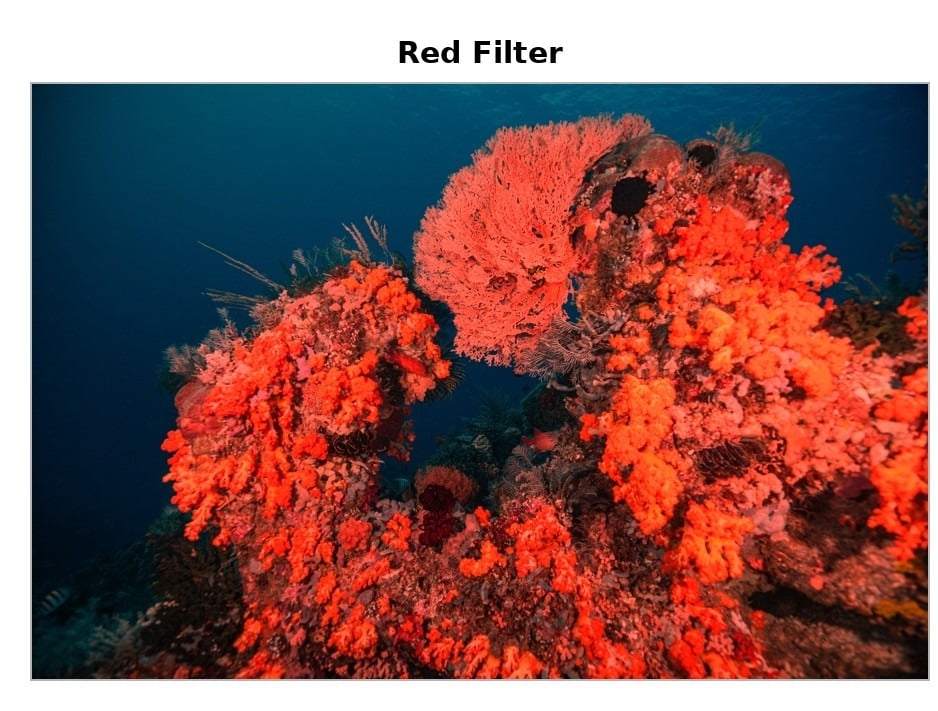
A red filter can help when you are shooting wide scenes with ambient light in blue tropical water. It works best when there is still enough sunlight for the camera to balance against, usually in shallower to mid depth conditions.
A red filter is not a universal fix. Used too shallow, it can make your footage look overly warm or unnaturally red. Used too deep, in heavy shade, or too far from your subject, it may darken the image without restoring natural colour.
Use a red filter when you are filming wide ambient light scenes in blue tropical water and there is still enough sunlight for the camera to work with. For deeper, darker, or close up scenes, video lights may give you better results.
If the water has a strong green cast, a magenta filter is usually a better choice than a red filter. This can be useful in plankton rich or nutrient rich conditions where a red filter may make the footage look muddy instead of balanced. Underwater Camera Store explains that red filters are commonly used for blue water, while magenta filters are generally used for green water.
For a liveaboard trip, a practical setup is to bring a small set of filters rather than relying on one filter for every dive. Conditions can change between dive sites, especially on itineraries that include reefs, walls, manta sites, pinnacles, and current prone areas.
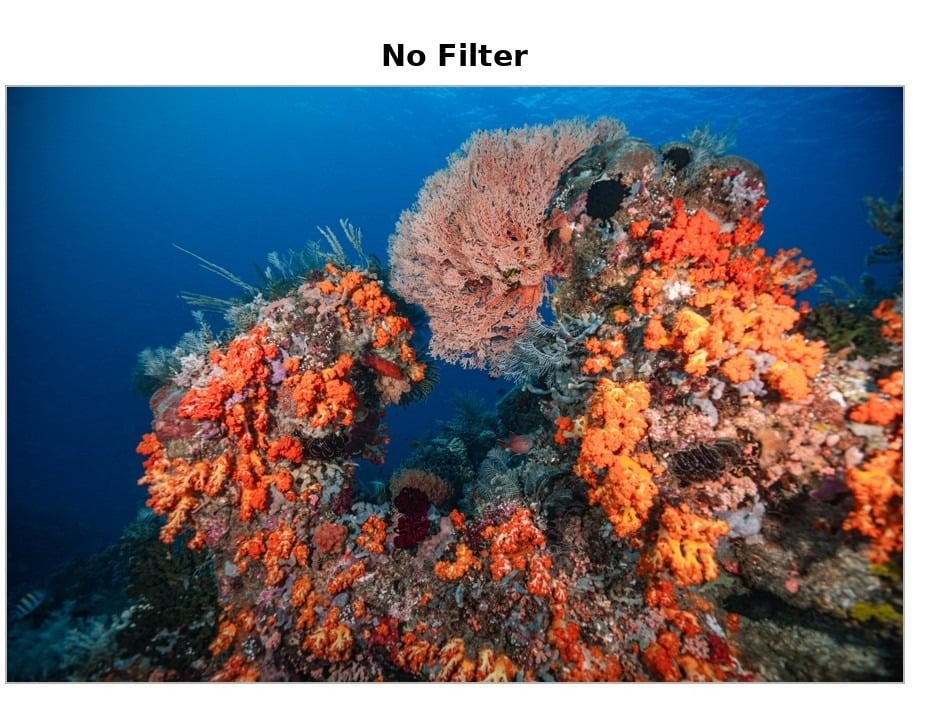
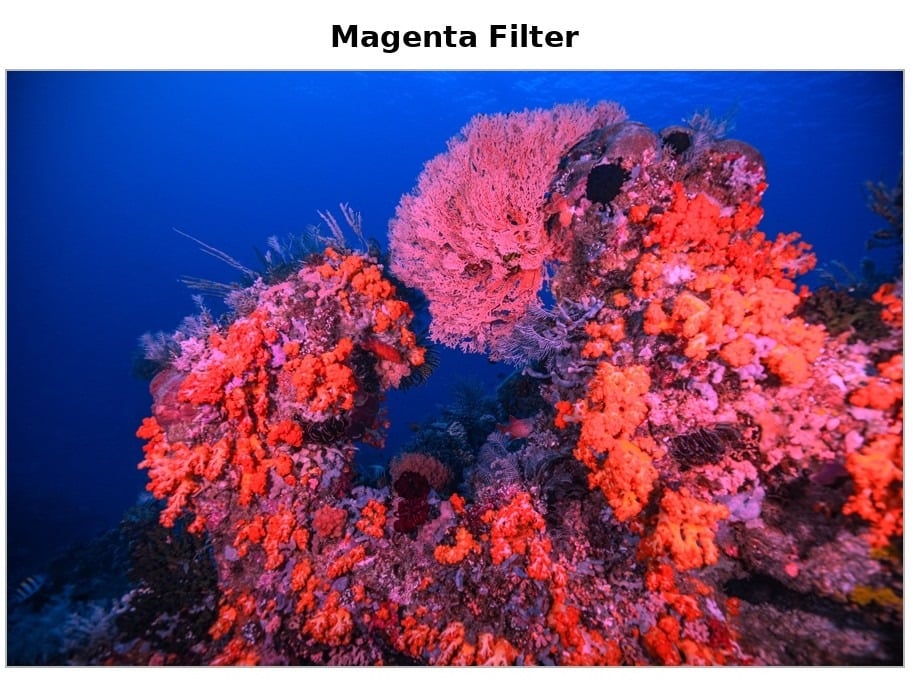
Red Filter, Magenta Filter, Lights, or No Filter?
| Dive Situation | Better Choice | Why |
| Bright shallow reef, 5–10 metres | Auto WB or light red filter | Ambient light is still strong |
| Blue water, 10–20 metres, wide reef scene | Red filter | Helps balance the loss of warm tones |
| Green or plankton rich water | Magenta filter | Red filters can make green water look muddy |
| Close subject under 1 metre | Video lights | You need real light, not only colour correction |
| Manta, reefscape, or diver far away | Filter or ambient light setup | Compact lights will not reach distant subjects |
| Night dive or swim through | Video lights | White balance cannot replace missing light |
| Strong video lights on a close subject | No red filter or minimal filter use | Red filter plus lights can make the subject too warm |
When Video Lights Are Better Than White Balance
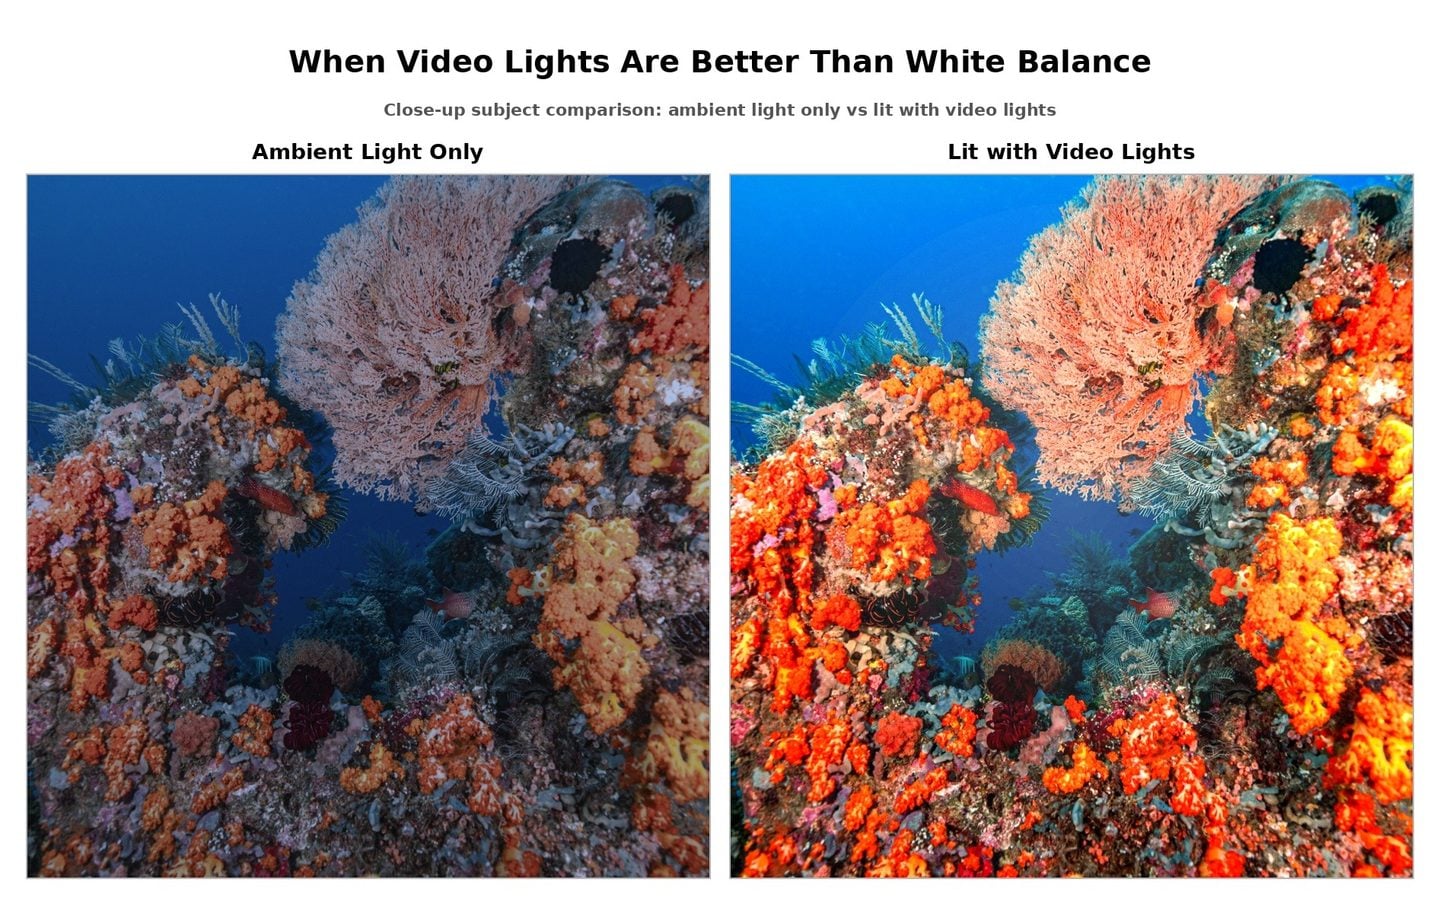
Video lights are the better tool when your subject is close enough for the light to reach it. Unlike white balance or filters, video lights add real colour back into the scene instead of only correcting the available light.
Use video lights when you are filming:
- nudibranchs or macro subjects
– coral details at close range
– reef fish within your light range
– your buddy close to the camera - Swim throughs and overhangs
– night dives
– Close focus wide angle shots
But lights also have limits. They only work well when your subject is close. If you are filming a wide reef scene, manta ray, or diver several metres away, most compact video lights will not illuminate the full scene.
You will get more consistent footage when you choose the tool based on the shot: filters for wide ambient light scenes, video lights for close subjects, and post production for matching clips from the same dive. For close up subjects, use video lights. For wide ambient light scenes, consider a filter. For footage you plan to edit later, use a flatter colour profile where available.
READ ALSO: 8 Tips On How to Take Good Underwater Photos with a GoPro
Best Action Camera Settings to Reduce White Balance Problems
Reducing action camera white balance issues underwater starts with keeping your camera settings stable and choosing the right setup for the available light. Settings vary between GoPro, DJI, Insta360, and other action cameras, but the principles are similar: keep your footage stable, reduce unnecessary auto shifts, and capture enough information for colour correction later.
Instead of looking for one perfect underwater setting, think in terms of control. You want fewer sudden exposure changes, fewer colour jumps in the middle of a clip, and enough image quality to edit your footage after the dive.
Use the highest useful resolution
Shoot in the highest practical resolution your workflow can handle. For most modern action cameras, 4K gives you enough detail for cropping, stabilisation, and colour correction without making the files unnecessarily difficult to manage.
Keep your frame rate realistic
Be careful with high frame rates underwater. Slow motion can look great for schooling fish, mantas, or diver movement, but higher frame rates need more light. In darker underwater conditions, very high frame rates can force your camera into noisier, flatter, or underexposed footage.
If the scene is already dark, shaded, or deep, a more realistic frame rate may give you cleaner footage than forcing slow motion on every shot.
Use a flat or natural colour profile if you plan to edit
A flat profile may look less exciting straight out of the camera, but it can give you more flexibility in colour correction. This is useful if you want to adjust blue, green, contrast, and warmth later.
Lock your settings when possible
If your camera allows it, lock exposure and white balance once the scene looks stable. Sudden auto shifts are one of the main reasons clips from the same dive look inconsistent and harder to edit later.
Stay close to your subject
Water reduces colour, contrast, and sharpness. The less water between your lens and your subject, the cleaner your colour will look. Even with the right filter or lights, your footage will usually improve more from getting closer than from changing one more setting.
How to Adjust Your Setup During a Liveaboard Trip
On a multi day La Galigo liveaboard itinerary, you have one major advantage: you can review your footage between dives and adjust before the next site. Use your first dive to test your colour profile, filter choice, exposure behaviour, and whether your footage shifts colour mid clip.
After the dive, check a few clips before the next briefing. Is the footage too blue, too green, too dark, too flat, or inconsistent between scenes? Use that information to adjust your filter, lights, frame rate, exposure lock, or shooting distance for the next dive.
If you are diving Raja Ampat or Komodo with La Galigo, you may move between shallow reefs, walls, manta sites, pinnacles, macro areas, and night dives within the same trip. Do not expect one setup to work everywhere. Treat each dive as a new lighting situation.
READ ALSO: 9 of the Best Places and Times to Dive with Manta Rays
How to Fix Blue Underwater Footage After the Dive
Post production can help correct action camera white balance issues underwater, especially if you shoot in a flat or natural colour profile. Start by correcting exposure, then adjust temperature and tint before increasing contrast or saturation.
Editing still has limits. If the clip is extremely blue, dark, noisy, or filmed from too far away, you may not be able to recover natural looking colour. This is why your in water decisions still matter: distance, light, depth, and filter choice affect how much colour information you can work with later.
A simple editing workflow is:
- Correct exposure first.
- Adjust white balance or temperature.
- Add tint carefully to reduce green or magenta casts.
- Increase contrast moderately.
- Add saturation lightly.
- Compare clips from the same dive so colours stay consistent.
Avoid overcorrecting. Your footage should still feel underwater. If the reef looks neon, the sand turns orange, or your buddy’s skin tone looks unnatural, pull the correction back.
Common Mistakes That Make White Balance Worse
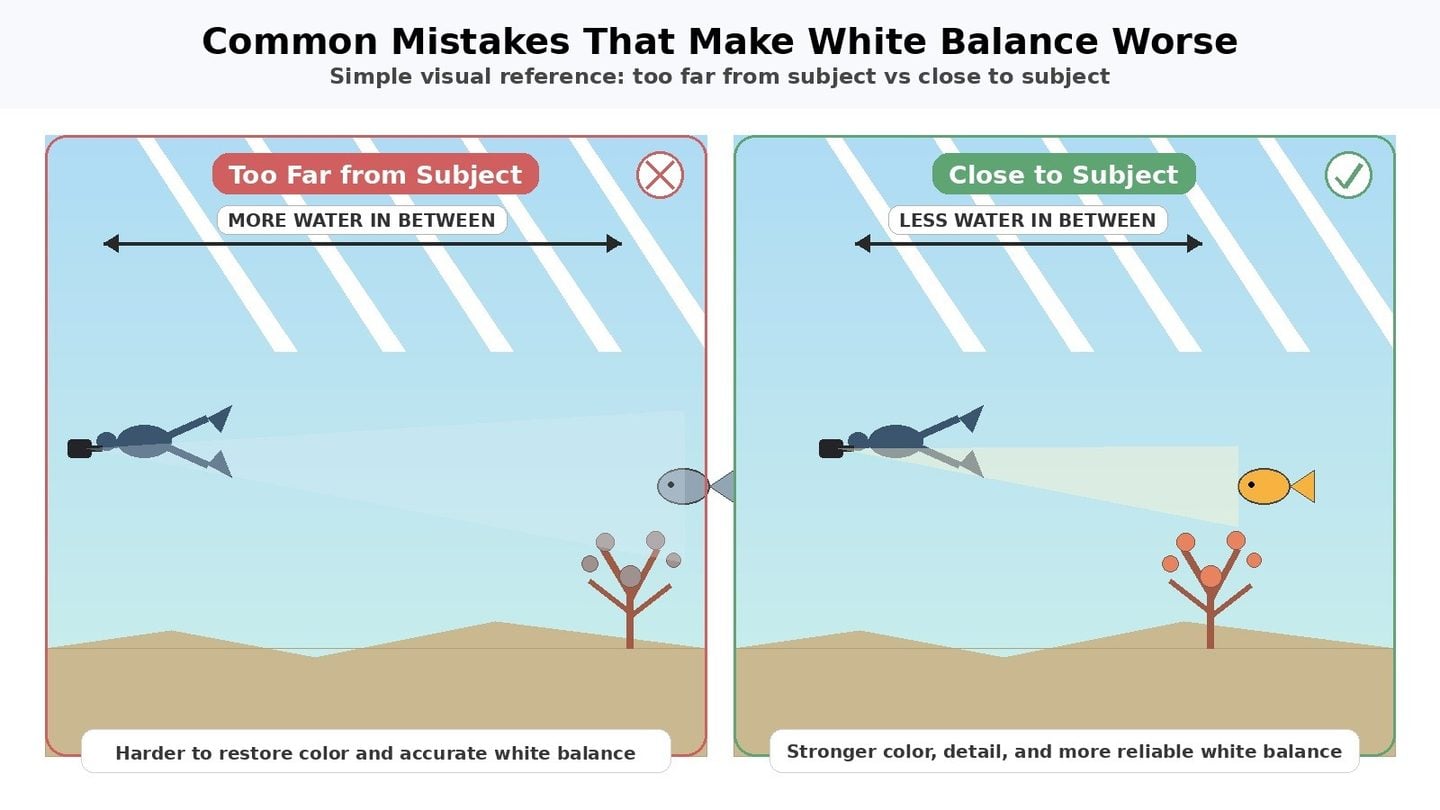
Even experienced divers can create white balance problems through small decisions before or during the dive.
The biggest mistake is treating one setting as your default for the whole trip. A shallow reef in Raja Ampat, a shaded wall in Komodo, and a manta cleaning station may all need different approaches.
On a liveaboard, you have the chance to adjust instead of repeating the same mistake all week. Review your clips, notice what changed, and refine your setup before the next dive.
Another mistake is using a red filter with strong video lights. The filter warms the scene, and the lights add warm colour too, which can make close subjects look overly red. If you are using lights as your main colour source, you may not need a red filter.
Another mistake is filming too far from your subject. Even the best action camera will struggle when there is too much water between your lens and the reef, your dive buddy, or the marine life you are filming.
Finally, never let the shot compromise your buoyancy, trim, or awareness. No footage is worth touching coral, chasing marine life, silting the bottom, or separating from your buddy. The best underwater footage usually comes from calm, controlled divers who stay close enough to film well without disturbing the reef.
Before Each Dive: Quick Action Camera Checklist
Before you enter the water, ask yourself a few quick questions:
- Is this dive mostly wide angle, macro, manta, wall, reefscape, or night footage?
- Is the water likely to be blue, green, shaded, or low light?
- Will your subject be close enough for video lights to help?
- Do you need a red filter, magenta filter, lights, or no filter?
- Are your exposure and white balance settings likely to shift mid clip?
- Do you have enough battery and memory for the full dive?
- Is your housing clean, sealed, and free from fogging risk?
This quick check is especially useful on a liveaboard because each dive site can ask something different from your camera setup.
Simple Setup Recommendations for Liveaboard Diving
On a liveaboard, you usually have the advantage of multiple dives across several days. That means you can test your settings, review your footage between dives, and improve quickly.
A practical liveaboard ready action camera setup includes:
· your action camera in a proper dive housing
· anti fog inserts
· a secure tray or handle
· a red filter for blue water ambient light shots
· a magenta filter for green or plankton rich water
· one or two compact video lights for close subjects
· spare batteries and memory cards
· a simple rinse and drying routine after every dive day
On a La Galigo liveaboard itinerary in Raja Ampat or Komodo, this setup gives you flexibility for shallow reefs, walls, manta sites, macro dives, and night dives without forcing you to travel with a large camera rig. You can test your setup, review your footage between dives, and make smarter adjustments as the trip progresses.
That is where liveaboard diving gives you a real advantage: you are not trying to get everything right in one dive. You have the time, dive variety, and onboard rhythm to improve your footage throughout the journey.
Final Thoughts
Action camera white balance issues underwater are normal, even if you already know your camera well. Underwater colour depends on depth, distance, water colour, available light, and the tool you choose for the shot.
To get more consistent footage, stop treating white balance as a single fix. Use filters for wide ambient light scenes, video lights for close subjects, stable settings for consistent clips, and post production to match footage from the same dive.
In Raja Ampat and Komodo, where you may move between reef tops, walls, manta sites, macro areas, and night dives, preparation makes a real difference. A La Galigo liveaboard gives you the dive variety and time between dives to test, review, and improve your setup throughout the trip. The better you understand your camera’s limits underwater, the easier it becomes to capture footage that matches what you actually experienced on the dive.
To get more consistent footage, stop treating white balance as a single fix. Use filters for wide ambient light scenes, video lights for close subjects, stable settings for consistent clips, and post production to match footage from the same dive. Most importantly, keep your diving safe and respectful. The best underwater footage comes from calm divers who understand both their camera and the reef around them.
In destinations like Raja Ampat and Komodo, where you may move between reef tops, walls, manta sites, macro areas, and night dives, preparation makes a real difference. The better you understand your camera’s limits underwater, the easier it becomes to capture footage that matches what you actually experienced on the dive. Once you understand why your footage turns blue or green, you can start making smarter choices before every dive.
Refrences
Chiang, J. Y., & Chen, Y.-C. (2012). Underwater image enhancement by wavelength compensation and dehazing. IEEE Transactions on Image Processing, 21(4), 1756–1769.
Ancuti, C. O., Ancuti, C., De Vleeschouwer, C., & Bekaert, P. (2018). Color balance and fusion for underwater image enhancement. IEEE Transactions on Image Processing, 27(1), 379–393.
Akkaynak, D., & Treibitz, T. (2018). A revised underwater image formation model. Proceedings of the IEEE Conference on Computer Vision and Pattern Recognition, 6723–6732.
Akkaynak, D., & Treibitz, T. (2019). Sea-Thru: A method for removing water from underwater images. Proceedings of the IEEE/CVF Conference on Computer Vision and Pattern Recognition, 1682–1691.
Ancuti, C., Ancuti, C. O., Haber, T., & Bekaert, P. (2012). Enhancing underwater images and videos by fusion. 2012 IEEE Conference on Computer Vision and Pattern Recognition, 81–88.
Lai, Y. L., Ang, T. F., Bhatti, U. A., Ku, C. S., Han, Q., & Por, L. Y. (2025). Color correction methods for underwater image enhancement: A systematic literature review. PLOS ONE.